
“Building My Own Dome Home”
Welcome to my journal I have created for the building of my Dome home!
There are pictures posted here as I move through each phase of the process.
I appreciate any and all encouragement, advice, comments, suggestions etc.
I first saw a geodesic dome house back in 1976 and was amazed with the design!
I knew very little about them at that time.
All of that has changed in the last 25+ years!
In the search for a house design, to replace an old worn out mobile home that I had, I rediscovered the Geodesic Dome!
I chose to build a 29′ diameter Mid Profile designed dome that allows for three extension openings. I bought the hardware kit and plans from Natural Spaces Domes in Minnesota during the winter of 2001. I spent the time up until May of 2003 gathering up the lumber, prefabricating the dome struts and exterior panels as per the plans.
The building site is three waterfront lots overlooking a really nice stretch of a 5000 acre lake here in Kentucky.
Absolutely beautiful location!
This is how I built my Dome Home…
First, came the 3′ deep holes (24″ frostline in KY) for the concrete piers. The layout was provided in the plans that I purchased from Natural Spaces Domes. I have decided to build the dome first, then move the old trailer, to make room for the third extension. The third extension will be the lakeview side of the house.
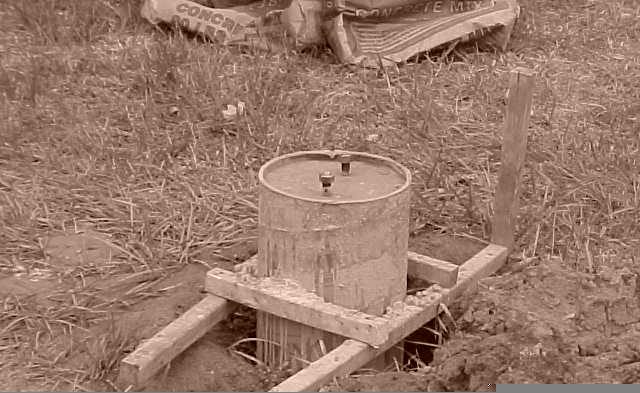
Above a photo of one of sixteen concrete piers. They are three feet in the ground. Anchor bolts were installed in each pier. Alot of work for one person! Thankfully I own a concrete mixer!

Layed out for a 29′ Mid Profile three extension Natural Spaces Dome.
Level at last! Heck with laser levels! I used a water level! Getting everything level was a challenge.

Here is a closer look at the wood to the concrete connection. Those are Simpson Strong Ties (ABU44 connectors) between the wood and the concrete piers.


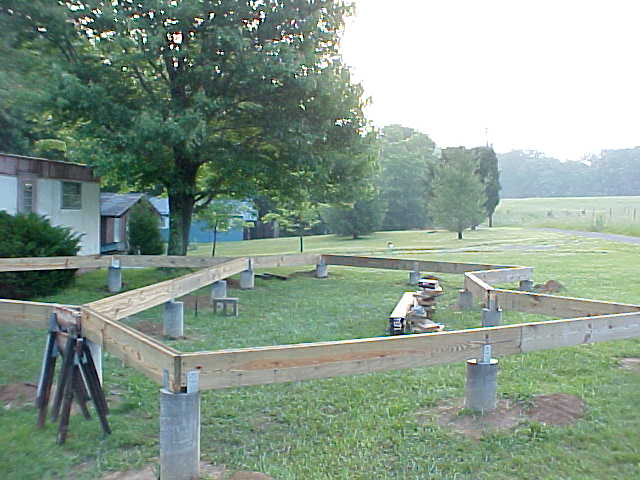
Turning this pile into the joists is quite a challenge with one person only. Work still continuing slowly.
And then… Help Arrives! Yes!


When “Foreman” Frank, “Dancing” Donnie, “Nail Gun” Greg and “Caulk Gun” Bo arrived, progress was being seen!
We all finished the joists, installed the cross bracing, and nailed the 3/4″ tongue and groove plywood on top of the joists. Ample amounts of “Liquid Nails” was applied to to the tops of the joists to help make everything one secure unit.

Above is a picture of the metal cross braces nailed between the finished joists. The bottoms were not nailed until a load is applied to the joists as per instructions.

Thanks for the help! The above picture shows what we accomplished!

The next day I cleaned up the site and my girlfriend and I applied a coat of Thompsons Water Seal to the plywood surface. Next will be installation of the riser walls. The third extension will be added after the old trailer is moved.


The design calls for four 45″ high riser walls. This gets the bottom of the dome up off the floor which will provide a little more head room up in the planned loft.
Time to start bringing in the dome
components that I have already prefabricated
My intentions were to just haul the struts to the site and store them in my
icosahedron shed that I built last year.
But I couldn’t control myself!
I just had to see what one man and one ladder could do all alone.
I managed to place nine of the struts all by myself. I will need to
erect scaffolding to accomplish more.

Scaffolding is set up, however rain, wind and lightning come, progress slow…

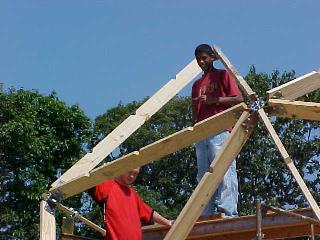
Never underestimate the power of teenage volunteers!
After just a few minutes of instruction time
Sean and Shane were putting struts up faster
than I could tell them where to place them! Thanks Guys!

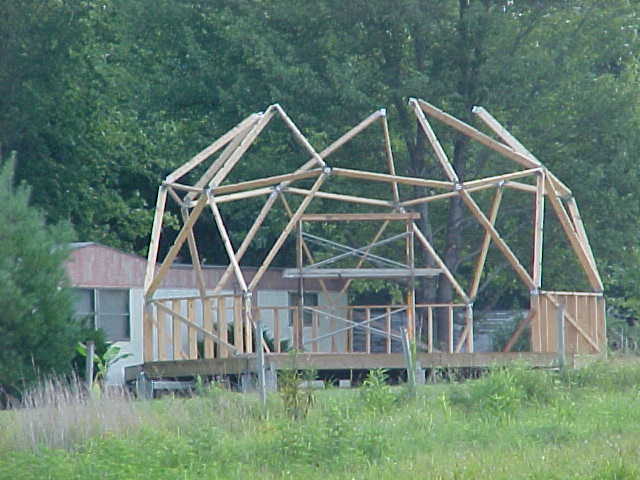

Seems as though I decided to build my dome during the rainy season!
Rain Rain…….Go Away! I want to work on my Dome Today!
The rains finally let up and I was able to proceed with more of the struts. Working alone is slow. Climbing up and down the scaffolding is wearing me out also! Here is the latest picture. Six more struts to go!!
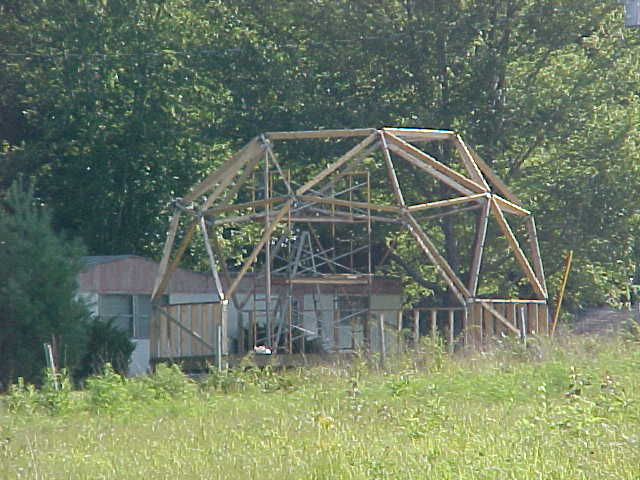
Next the exterior panels go on!
Below is a picture of one of the hub and connector assemblies. See the rainbow?
What a beautiful location to build a dome home!

Just a note here about the site again…….
I have lived in Louisville, KY since I was a kid and always loved the outdoors “away from it all.” That was difficult to find in the city. The day I ran across this property I knew immediately I wanted it. At the time the property was for sale there was 29 people looking and 4 serious buyers involved. Luckily, I walked away with the deed. It is only 3 waterfront lots, about an acre in size, side by side, overlooking a 5000 acre lake called Rough River Lake. It is a manmade reservoir. Construction began in 1955, the year I was born. The lake winds thru Breckinridge and Grayson counties. The area is just chocked full of wildlife. We see deer, turkeys, hawks, owls, eagles, birds galore and all of mother nature in all directions. It is on top of a hill. The view is spectacular! The lake offers some really great fishing and sport boating, skiing etc. I am still learning about all of the great little tributaries that run into the lake. Bass, Crappie, Bluegill and Catfish are easy to put on the table! Across the road is a huge farm that the owners have had in their family for a long long time. They tell me there will be no property for sale anytime in the near future. This I like!
Just this year (2003) we finally got city water. Of course electric and phone lines were there before I purchased the property. Television is from a satellite. So, all of the modern conveniences are present along with nature! If you need a loaf of bread or milk there is a 10 mile drive to get it. There are only 5-6 other full time residences along the one mile long gravel road that leads back to the site.
The day I finished the concrete piers a deer walked up and sniffed around. I assume she was wondering what was going on in “her” living space! The first eagle that my girlfriend and I spotted was when the lake was completely frozen over. The eagle was pecking at the ice at what we believed was a dead fish that had floated to the top of the lake and was frozen at the surface.
We were very excited to see this!
We had heard that eagles were in the area but until you see one it is just not the same. Since then we have seen several and just recently have learned that they do indeed have a nest there.
I finally had the opportunity to get a picture of one that was flying directly over the dome. It was the first time I had my camera close by when one was above us.
 What a majestic bird!
OK BACK TO THE DOME BUILDING PROCESS…….
Work seems to be still going slow.
Attaching the triangle exterior 3/4″ plywood panels is nearly impossible by myself. I have been able to get some help here and there and some of the help thought it best to start at the top of the dome and some of the help thought it best to start at the bottom.
This is why the panels are sort of attached in a random pattern at this point. I didn’t really care where we placed them!
I was just glad to have some help!


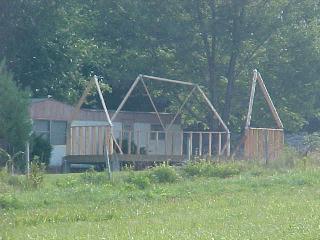
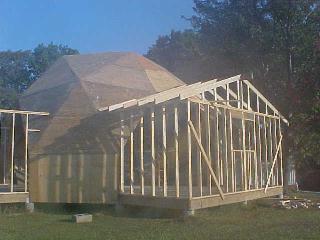
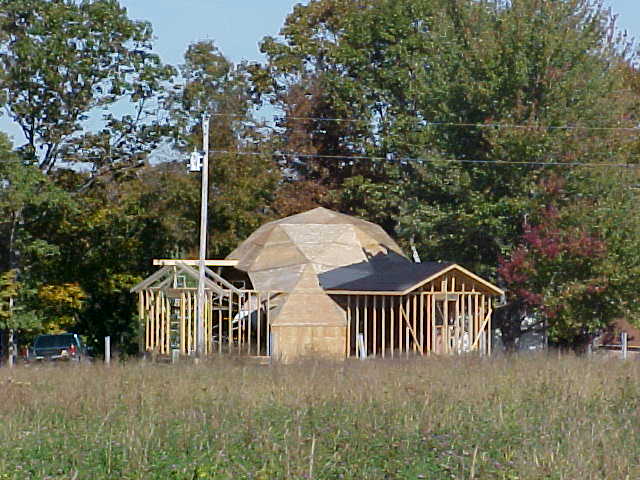
 Ok, all of the exterior panels are almost finished! Whew! If you are planning on building a dome make certain you have help during this stage! It is nearly impossible to do this by yourself! Next comes the framing for the extensions. This part will be much easier by myself, plus I have more experience with conventional framing. Lumber prices are starting to extremely expensive now also! Next pictures will hopefully be of the extensions framed. Wish me luck!
Well, this weekend was fairly productive. I was able to get the two extensions walls framed up. Here is a picture of that progress:
 Next, the gable roof frames on the extensions and hopefully start getting some tar paper on that dome roof!
Again, never underestimate the power of a teenage volunteer! Brad was the lucky one this day! After looking at the dome frame and the spacious area that this type of structure provides, I think he is hooked on domes now also! I will have to volunteer to help him with his dome someday!

Ready for sheathing, ice shield and 30# tar paper now. This is the extension that will become the kitchen area. The other extension will be for entryway and storage. The third extension will begin after the old trailer has been moved.
Progress seems slow but when I stand back and look at the Dome house as a whole, everything is starting to take shape now…..
Time to start getting this thing water tight before winter sets in…
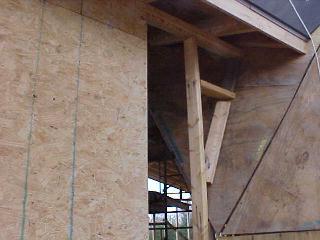
I had to add some “nailers” in the triangles on the dome due to the fact that not all of my tongues and grooves lined up at the time we were installing the sheathing on the dome. I must add here that was not called for in the plans. The easiest remedy to this was to add a nailer in this area and secure the triangles. Also some creative framing was needed where the extension meets the dome. This type of work was time consuming working alone but very necessary to make certain all edges were to be nailed down and secure.

After completing the above tasks, I was confronted with a very windy day so decided to start the exterior sheathing on the extension instead of “trying” to attach felt paper to the top of the dome in high winds! Following the high winds was rain in the forecast so I decided to put the “big old tarp” on! My girlfiend and I had a heck of a time doing that! Probably would have been easier if we just put the felt paper up!


Next is felt paper (30# tar paper) on the roof and try to get some more of the sheathing done on the extensions. Winter is right around the corner!
30# Felt Paper! Whew!
That statement I just made above about “Probably would have been easier if we just put the felt paper up!” was certainly not true!
Again, here is another task that I highly recommend having help.
Thanks to Greg (again), I had help!
I had felted the gable roofs with little or no problems.
The dome was a challenge.
At one point Greg was precariously hanging over the top of the dome nailing while I held his feet to keep him from slipping down
! Good thing we are friends! HaHa!
After a hard days work, we enjoyed a good home cooked meal, that Cindy “always” seems to do just right!
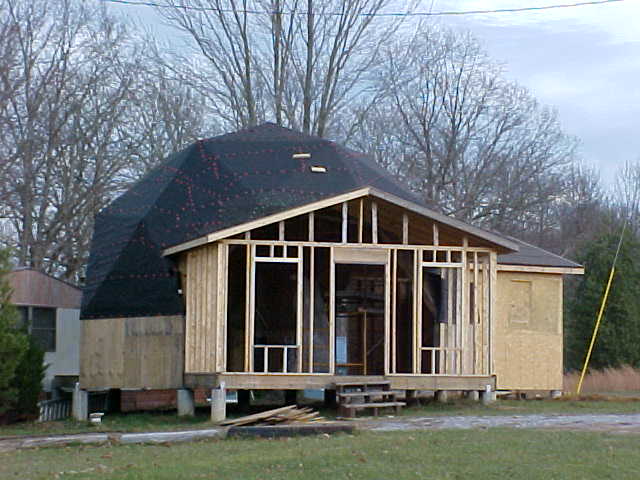 Above is a picture of a view of the dome felted and the front entrance framed and ready for sheathing. Windows and doors get installed quick I hope.
Winter weather is bound to be moving in soon.
…AND IT DID! BRrrrr!
 Snow melted……Back to Work!
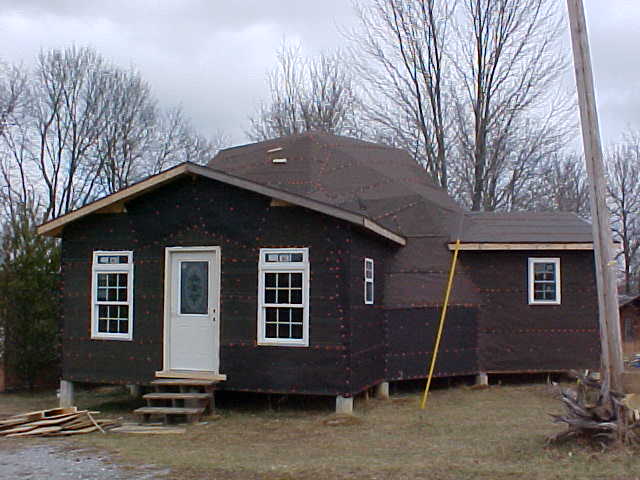
When the weather broke I got back to finishing up the windows and door installation. I now have the whole thing covered in tarpaper!.
The hole for the third extension (on the trailer side) is temporarily covered up with some of the scrap plywood I had been saving.
So for now….
WEATHERTIGHT!
 Time for some hot chocolate!
It took what seemed like forever to get the old trailer moved away so I could get started on the third and final extension. The deal I struck was, Free Trailer home if YOU move it! I had expected several people to JUMP at such an opportunity. Below is a picture of the FINE High Quality Free Item! HaHa! You can see the top of the dome just above the trailer.

Now that I have the trailer away from the back of the dome, I can begin construction of the third extension. The construction process is the same as the previous extensions, first concrete piers, then subfloor, walls etc.
I was lucky enough to find a fantastic deal on some really nice doors while waiting to get the old trailer moved and these doors will be placed in the lakeview side of the dome and will literally create a room with a view!
Progress again was slow working alone so I was very pleased to see Greg show up again on the site. THANK YOU GREG!!! I threw three chickens in the old hickory smoker and to work we went! Him and I managed to get the sheathing on the framing that I had already finished. Then came the doors!
Some “dork” (me, myself and I) managed to screw up the frame openings for the doors and the windows! That seemed to take an extra day to straighten out….UGH! But in the end we got them installed. Oh, and those chickens? El Perfecto! Cindy fixed a heapin’ helpin’ of tater salad and some onions and cucumbers that just made us forget all about the work!
Here is the result……The third and final extension!
I still have a bit more sheathing to finish up and put up some tar paper on that roof yet.
I will be calling in the roofers very very soon…….
I hired Alberhasky Roofing out of Louisville, KY to tackle the shingling. This is the first dome these guys have roofed. After reading through the instruction manual that Natural Spaces provided and climbing around on the dome to get a first hand look at the project, I am confident that they will do a superb job for me.
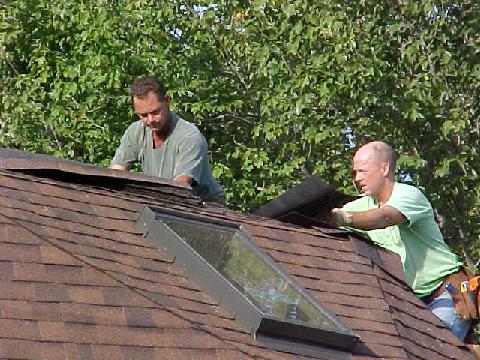
Perry and David paid special attention to how everything overlapped from triangle to triangle. The Triangles that point up get roofed first, then the triangles that point down overlap on to that surface. Lots and lots of “Grace Brand Ice Shield” was applied to the valleys and gables. I am very glad that I called in the “pros” for the shingling! These guys thought of stuff that I would have NEVER imagined that needed to be done! There is NO WAY I could have done this good of a job without them! Special attention was needed around the skylights. The roofers brought their own brake and just created the needed flashing on the spot. I was the designated “helper” on this portion of the project! Roofing is NOT my next career! Thanks Guys! Writing the check was WELL worth it!
more pics coming soon…
I want to give a “Special Thanks” to my girlfriend who has been so much help throughout this project. Bless her heart, for what she has had to put up. When all is going great and then those times when things weren’t going so grand, there she stood (sometimes laughing). She has rubbed out the kinks in my muscles. She has bandaged the cuts on my fingers. She has wiped the sweat off my face. She has cooked for nearly anyone I can drag to the site to help me. She has heard me cuss and she has heard me laugh. She even has had to put up with my bragging and my boasting. She has been entertained and frustrated right along side of me the whole time.
Thanks Baby!
Thanks for all of the kind words of encouragement and support I have been receiving! Keep ’em coming!
MORE TO COME SOON! Thanks for looking!
Please feel free to email me with any suggestions, comments, advice or?
Email me!